Assess Your Core Mobility Requirements First
Start by identifying how the van will be used. An independent driver needs different controls and access than a passenger-only rider. For independent drivers, the vehicle must allow safe, repeatable entry to the driver’s seat from a wheelchair—typically via a lowered floor and integrated hand controls. Passenger-only users prioritize ample interior space for the wheelchair and caregiver access. The driving role directly determines the required entry configuration and interior layout.
Next, evaluate your daily environment. Urban parking is often tight, making side-entry vans ideal for curb-side boarding away from traffic. Measure your home garage: many standard garages lack the width or height clearance for full-size accessible vans. Also consider terrain—steep or uneven driveways may favor an in-floor ramp over a fold-out design, which requires stable, level ground for safe deployment. These physical constraints significantly narrow feasible vehicle options.
Finally, set a realistic budget that balances upfront cost with long-term value. Certified conversions from established manufacturers—such as BraunAbility, VMI, or Freedom Motors—include comprehensive warranties and meet FMVSS and ADA standards, protecting your investment. While base conversions range from $30,000–$50,000, professionally engineered work reduces long-term repair costs and preserves resale value. Weigh initial price against expected lifespan, warranty coverage, and service network support to make a financially sound decision. A thorough assessment of these core requirements ensures you select a wheelchair accessible van that truly fits your lifestyle.
Compare Side-Entry vs. Rear-Entry Wheelchair Accessible Van Configurations
Side-Entry Vans: Ideal for independent drivers needing curb-side access and maneuverability
A side-entry wheelchair accessible van places the ramp on the passenger side, enabling boarding from the curb—away from traffic—and supporting independent operation. This configuration is the top choice for individuals who drive from their wheelchair or sit in the front passenger seat. Side-entry models feature a lowered floor and often include removable or rotating front seats to simplify transfers. Ramps are typically in-floor or fold-out, preserving the rear cargo area for luggage, medical equipment, or mobility aids. However, side-entry vans require additional clearance on the passenger side for ramp deployment, making parallel parking in dense urban areas more challenging. Despite their higher initial cost, the combination of curb-side safety, front-seat flexibility, and unobstructed storage makes side-entry vans the preferred option for independent drivers and those prioritizing long-term adaptability.
Rear-Entry Vans: Better for caregiver-assisted riders and larger wheelchair + passenger loads
Rear-entry vans deploy the ramp from the back, eliminating the need for side clearance and simplifying parking in standard spaces. This design suits passengers who always ride with a caregiver and do not require driving capability. Because the ramp system is mechanically simpler—often manually operated—rear-entry conversions tend to be more affordable and require less maintenance than side-entry models. The straight loading path accommodates larger power wheelchairs and can support two wheelchair positions side-by-side, making these vans practical for families or transportation providers serving multiple riders. The main trade-off is that the wheelchair user cannot occupy the front row or drive, and rear cargo space is partially occupied by the ramp and secured wheelchair zone. For caregivers prioritizing ease of loading, reliability, and budget efficiency, rear-entry vans deliver consistent, accessible transportation.
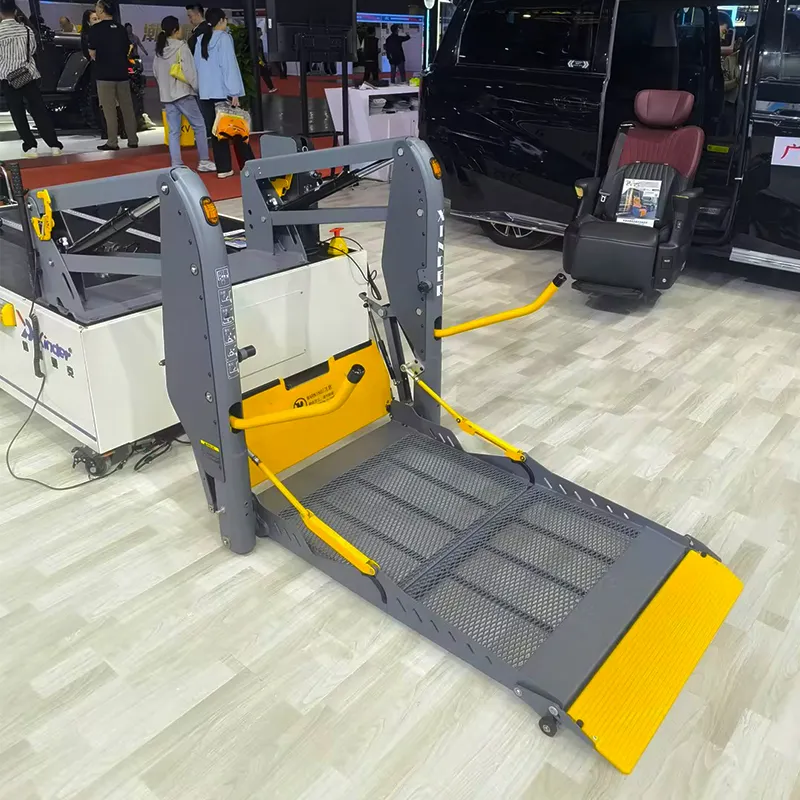
Evaluate Ramp Systems and ADA-Compliant Accessibility Features
In-floor vs. fold-out ramps: Trade-offs in interior space, structural integrity, and retrofit feasibility
When choosing ramps for a wheelchair accessible van, buyers weigh in-floor and fold-out designs based on usage priorities. In-floor ramps retract beneath the vehicle floor, preserving interior headroom and floor space while offering superior structural stability—since they remain fixed during use. They’re commonly found in certified side-entry conversions and align well with curb-side boarding needs. However, they’re more expensive and rarely retrofitted into non-converted vehicles due to complex integration requirements. Fold-out ramps, by contrast, mount externally or pivot from the door frame—making them easier and more cost-effective to install, especially in rear-entry or aftermarket conversions. They do reduce usable floor space slightly and require manual or powered deployment. Ultimately, independent drivers often prefer in-floor ramps for seamless, traffic-free access; caregivers may choose fold-out systems for affordability and straightforward maintenance.
Critical ADA benchmarks: 30" minimum ramp width, ≤6° slope, and ≤25 lbs deployment force
All ramps in public-use or certified accessible vehicles must comply with ADA accessibility standards to ensure safety and usability. Key requirements include a minimum clear width of 30 inches, a maximum slope of 6° (equivalent to a 1:12 rise-to-run ratio), and a maximum deployment force of 25 pounds for manual operation. Weight capacity is equally critical: ramps longer than 30 inches must support at least 600 pounds; shorter models require a minimum 300-pound rating. Additional essentials include slip-resistant surfaces, edge protection, and secure anchoring to prevent lateral movement. These benchmarks are enforced under ADA Title III and referenced in FMVSS No. 222 for school buses and transport vehicles—standards widely adopted across the accessible van industry.
| Requirement | Specification |
|---|---|
| Minimum clear width | 30 inches |
| Maximum slope | 6° (1:12) |
| Maximum deployment force | 25 lbs |
| Weight capacity (>30" length) | 600 lbs |
| Weight capacity (≤30" length) | 300 lbs |
Optimize Interior Layout for Safety, Comfort, and Secure Transport
Headroom and floor space: Why 57"+ headroom and 30" × 48" clear area reduce fatigue and fall risk
Adequate headroom and unobstructed floor space are foundational to comfort and safety in a wheelchair accessible van. A minimum of 57 inches of vertical clearance allows occupants to sit upright without neck strain—critical for reducing fatigue on longer trips. The 30-inch by 48-inch clear floor area provides sufficient room for repositioning, turning, and transferring safely, minimizing contact with cabin fixtures or sharp edges. This dimension also supports stable footing during entry and exit, lowering fall risk—especially for users with limited trunk control or balance challenges. Always verify interior measurements with a tape measure rather than relying solely on manufacturer claims, as real-world build tolerances and added equipment (e.g., tie-down tracks, flooring overlays) can reduce usable space.
Wheelchair securement best practices: Four-point tie-downs plus lap/shoulder restraints (NHTSA-backed)
Securing both the wheelchair and its occupant is non-negotiable for safe transport. A four-point tie-down system—anchoring each corner of the wheelchair to reinforced floor points—prevents forward, backward, and lateral movement during sudden stops or turns. Occupants must also wear a properly fitted lap and shoulder belt assembly, per National Highway Traffic Safety Administration (NHTSA) guidelines. These restraints function together: the tie-downs stabilize the chair; the belts protect the rider from ejection and upper-body injury in a crash. All securement hardware must be installed according to WC19 wheelchair testing standards and FMVSS No. 209/210 for seat belts. Never rely on seatbelts alone—or wheelchair brakes—as primary restraints. Confirm that your conversion provider certifies compliance with ADA, FMVSS, and NHTSA recommendations to ensure full legal and safety coverage.
FAQs About Wheelchair Accessible Vans
What are the key differences between side-entry and rear-entry vans?
Side-entry vans prioritize curb-side boarding for independent drivers and have features for seamless access to front seats. Rear-entry vans are ideal for caregiver-assisted users, offering affordability and compatibility with larger wheelchairs.
How do I choose between in-floor and fold-out ramps?
In-floor ramps are ideal for frequent independent use due to their compact integration. Fold-out ramps are often more affordable and work well for caregiver-assisted transport.
What are the essential ADA requirements for accessible van ramps?
ADA-compliant ramps must have a 30-inch minimum width, a maximum slope of 6°, and a maximum manual deployment force of 25 pounds. They should also support specific weight thresholds depending on their length.
Why is headroom and floor space critical in accessible vans?
Sufficient headroom (57 inches minimum) and an unobstructed floor area of 30 inches by 48 inches ensure comfort, safety, and reduced fall risk during entry, exit, and transport.
What securement features should my wheelchair van include?
Your van should have a four-point tie-down system for the wheelchair and lap/shoulder restraints for the occupant, ensuring maximum safety during transport.
Table of Contents
- Assess Your Core Mobility Requirements First
- Compare Side-Entry vs. Rear-Entry Wheelchair Accessible Van Configurations
- Evaluate Ramp Systems and ADA-Compliant Accessibility Features
- Optimize Interior Layout for Safety, Comfort, and Secure Transport
-
FAQs About Wheelchair Accessible Vans
- What are the key differences between side-entry and rear-entry vans?
- How do I choose between in-floor and fold-out ramps?
- What are the essential ADA requirements for accessible van ramps?
- Why is headroom and floor space critical in accessible vans?
- What securement features should my wheelchair van include?